What’s up everyone? This is the third and final part of “How I Designed the new Ajaxxx.com.” Let’s recap, shall we?
In the first part, I talked about the planning that went into the site. I analyzed the old site from top to bottom, assessing the areas that needed improvement. In addition, I also made notes of the things I really liked about the old site and how I’d carry them over. In the second part, I went further. I got much more technical and talked about things like the page numbers, the tag cloud, and the social media elements; I also talked about things I chose not to use.
So now, in this third edition, I’m going to tie it all together. I’m going to show you what plugins I used and didn’t use (and why), some of the back-end things I did to make my life easier, and also some additional stuff about the planning. And of course, I’ll go into what I did to finalize it all.
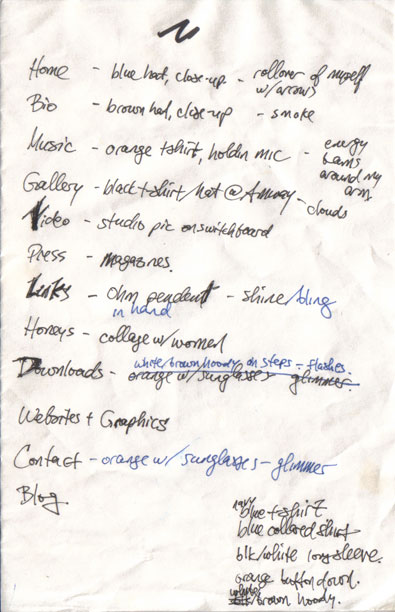
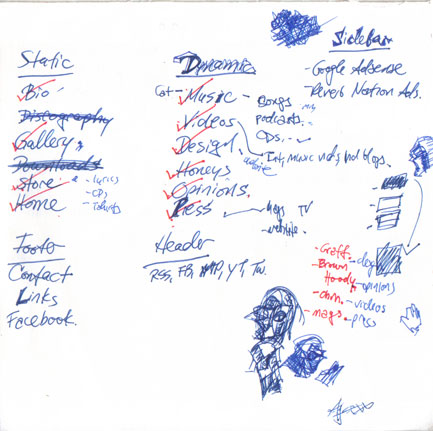
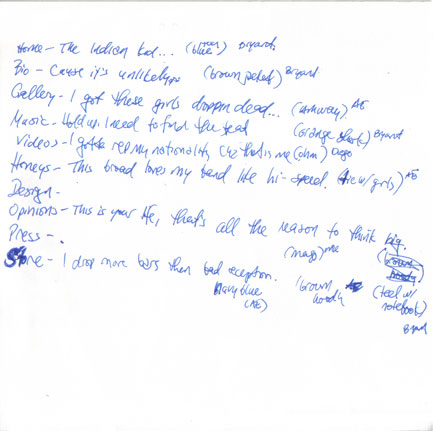
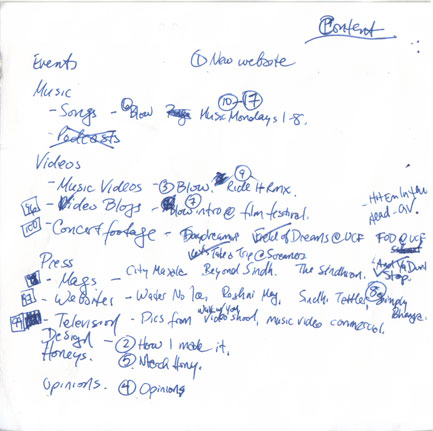
Before we go any further, I want to share with you some of the initial notes I made to myself before even touching a computer. I played around with different ideas as far as what categories and banners I wanted to have. To me, it’s important that you have somewhat of a plan before you implement something or you’ll be pulling your hair out later. By creating an outline, I was always able to revisit that if I lost my way. Check out some of my randomness below:
So let’s talk plugins. For those unfamiliar, my site is supported by WordPress. WordPress is…well, it’s hard to explain, so check out the WordPress site for a better explanation. Anyway, the way it works, you can install “plugins” for your site that provided added functionality. There are millions of plugins out there that can do almost anything you can imagine. The trade-off is (and I learned this the hard way) plugins can really weigh your site down and make it slower if there are too many. So anyway, I chose to use the ones most important and put together short scripts for others.
Here are some of the more important front-end plugins I used:
- Lightbox Gallery
- Disqus comment system
- NextGEN Gallery (which I later uninstalled)
And here are some of the more important back-end plugins I used:

Front-end plugins
So let me talk through some of them, what they do, and why you should consider them for your website. On the front-end side of things, you’ll notice there’s a cool effect when you click on any of the images in the galleries. The image pops up, instead of going to a separate URL (which is one of the issues I addressed with the old site). The Lightbox Gallery effect gives you a cool picture overlay where it dims the background and brings the picture to the front. It solved the problem of staying on the same page, but it also provided additional functionality so you can go from picture to picture just by clicking on it. I went through a few different variations of this because it was throwing off some other things, but eventually got it to work.
The other front-end plugin that you’ll notice I used is the Disqus comment system. There’s A LOT of comment plugins out there, but Disqus was the only one I found that had it all – RSS feeds, sorting, picture support, e-mail subscribing, avatars, liking, and even being able to post by signing into your Facebook or Twitter account. It definitely came through for me and I’d recommend it.
You’ll also notice I listed the NextGEN Gallery (which is an awesome plugin by the way), but that I uninstalled it. Why? Well, one of the issues I encountered was loading time. The NextGen gallery added all these additional scripts to the page which really bothered me. To solve this problem, I used the built-in WordPress gallery (which is very basic, but oh well). It works and saves a considerable amount of time.
Back-end plugins
On the back-end side of things, all the plugins I installed were for one reason – to improve performance. Again (and I’ll talk about this in a second), I kept having issues with loading time and became obsessed with having the site load quickly. So what’d I do? I installed a few different plugins to tackle different things. I won’t get too detailed with them, but the ones that really made the most difference were the WP Minify and WP Super Cache. Both of them go behind the scenes to crunch things and compress elements to improve the site speed. And let me tell you, the SuperCache one especially helped! I tried a few other cache plugins (notably W3 Total Cache) but couldn’t get them to configure correctly. Believe me too, I spent a considerable amount of time with those. But yeah, WP Super Cache was the one that worked best for me.
Addressing the Speed Issue

Okay, so here’s what happened. I was using GoDaddy hosting for years and years and years. I recommended them to everyone I did websites for because they’re great. One of the things I always appreciated was their outstanding customer service. So yes, I’ve been an advocate for awhile. However, every time I ran a speed test on my site, it took approximately five seconds for every page to load. Yes, five seconds. Now, that may not seem like a lot, but when you have to wait five seconds for every single link, it’ll drive you crazy. And for me, I’m huge on usability and making sure I’m not turning people away. I banged my head a lot trying to figure out why the site was going so slow, especially since I lightened it up a lot by removing most of the plugins I was using.
The main tools I used to measure speed? Yahoo! Yslow and GTmetrix.
After visiting many forums and blog sites, I decided to leave GoDaddy. Gasp, right? I decided to sign up for a different hosting company – HostGator – through some recommendations, not knowing what to expect. Well anyway, after migrating from GoDaddy to Hostgator, I ran my speed test again. The result? Each page was now loading in LESS than one second! Can you believe that? I was like WOW. It was an exhilarating feeling to conquer something that stayed plaguing you for so long (talk about being dramatic lol). So it looks like the culprit was the hosting, which in my case was GoDaddy. So I mean, although they have great customer service, they really couldn’t compete in the speed department.
Bringing it All Together

Once tackling the speed issue, I looked at some items on my checklist I needed to make sure I had before launching. These included:
- Dynamic banners along the top with picture and punchline
- Music player
- Mailing list
- Social media support (widgets and icons) because I’m very involved with these
- Ad support
- Populating each page (so the About, Discography, Appearances, Gallery, and Contact pages)
- Sindhi background
I also had to make sure that the site had a consistent look from page to page, and that it was easy to navigate around and find stuff. I showed it to a friend of mine to get an idea, and I also played with some different colors too.
I kept reminding myself of how difficult it was with updating the last site, so I also had to make sure I addressed a lot of my concerns during the building phase and not after it was live. So, I created a CSS script that would automatically resize any pictures (which was huge). I also did the same for resizing videos. In addition (and this was probably the last thing I did at like 1 AM before launching it the next day in the morning), I stylized the “Read More” button so I’d always have a way of compressing stories (which would of course save on loading time) and also incline readers like you and me to become engaged.
And there you have it. After a lengthy planning phase, I dove head-first into the world of WordPress and launched my site. I learned a great deal about CSS, plugins, site-speed, XML, MySQL, and more. I was also tested in lots of ways, which only made me smarter. I put A LOT of work into the site, and I hope it shows. If you have any questions or comments about anything, please hit me up below.
And with that said, that’s how I designed the new Ajaxxx.com.
Photo credits: ideaspined.blogspot.com, webseoanalytics.com, the10most.com, wikibase.info